Travis-CI Deployments to Laravel Envoyer via Amazon Lambda
Travis-CI is great at building applications and running tests on each code push.


Laravel Envoyer is great at deploying your PHP applications with zero downtime and minimal configuration.
Binding these two together is an important endeavor towards a smooth CI process.
Since Travis CI has the option of triggering a web-hook on each successful build, and Envoyer has a deploy URL that triggers the deploy, binding these two seemed a walk in the park.
Thanks to a useful post on Laracasts.com, I have managed to have the code deployed by Envoyer only when the tests passed in Travis.
However, I soon realized that it has also deployed any build, on any branch, including on any outstanding pull-requests. That meant a lot of useless deploys. This was happening because the Envoyer web-hook was triggered each time a build succeeded, no matter on which branch. And the Travis documentation on web-hooks doesn’t mention any customization on the logic of the web-hook dispatch feature.
Here’s where Amazon Lambda comes into play. I needed a script to check:
- If the build is due to a code push or pull request;
- If the build has occurred on a specific branch;
- If the build has completed successfully (and tests passed).
Amazon Lambda seems the right approach because we need a system outside of our pipeline, easily maintainable and hassle-free to process our logic of deciding when a Travis CI build should trigger an application deployment on Envoyer. Of course I could have spun up a Digital Ocean droplet or some VM somewhere to handle this. But I always try to avoid maintenance and costs wherever possible, while keeping quality high.
Therefore, AWS Lambda sounded good to me because it runs container-less functions, and the costs of what I’m doing here will forever be well under their free tier of one million requests per month.
The Lambda Function
Let’s create the Amazon Lambda function to handle this. Amazon Lambda needs to be accessible to Travis CI, which (currently) doesn’t support the signing of AWS requests, so we’re going to build a new Lambda Function, by selecting API Gateway as endpoint and without any security (this is important).

We’ll handle security from within out script. It can be an API key or anything else, and Travis supports creating encrypted URLs. This is not optimal in terms of security, but it’s as close to it as we need it to be. And the worse that can happen is having our deploy triggered more often that required, which will immediately raise some eyebrows among our development team.
In the next screen, select Node.js for the Runtime, and paste the following code:
var querystring = require('querystring');
var https = require('https');

exports.handler = (event, context, callback) => {

    const done = (err, res) => callback(null, {
        statusCode: err ? '400' : '200',
        body: err ? err.message : JSON.stringify(res),
        headers: {
            'Content-Type': 'application/json',
        },
    });

    if (event.httpMethod != 'POST') {
        done(new Error(`Unsupported method "${event.httpMethod}"`));
    }

    if (typeof event.queryStringParameters.branch === 'undefined') {
        done(new Error(`branch not specified`));
    }

    if (typeof event.queryStringParameters.envoyer_id === 'undefined') {
        done(new Error(`envoyer_id not specified`));
    }

    var requiredBranch = event.queryStringParameters.branch;
    var envoyerDeployId = event.queryStringParameters.envoyer_id;

    var jsonString = querystring.parse(event.body);
    var deployData = JSON.parse(jsonString.payload);

    if (deployData.type !== 'push') {
        return done (null, {
            'status' : deployData.status,
            'branch' : deployData.branch,
            'action' : 'skipped-pull-request'
        });
    }

    if (deployData.status !== 0 || deployData.branch !== requiredBranch) {
        return done (null, {
            'status' : deployData.status,
            'branch' : deployData.branch,
            'action' : 'skipped'
        });
    }

    // we have a successful deploy on the requested branch,
    // let's send the deploy request to Envoyer
    var deployUrl = 'https://envoyer.io/deploy/' + envoyerDeployId;

    var req = https.get(deployUrl, function(res) {
      var bodyChunks = [];
      res.on('data', function(chunk) {
        bodyChunks.push(chunk);
      }).on('end', function() {
        done (null, {
              'status' : deployData.status,
              'branch' : deployData.branch,
              'action' : 'deploy_success',
              'response' : Buffer.concat(bodyChunks)
        });
      });
    });

    req.on('error', function(e) {
      done (null, {
          'status' : deployData.status,
          'branch' : deployData.branch,
          'action' : 'deploy_error',
          'message' : e.message
      });
    });

};
Basically, the code above loads the payload from Travis CI, the target branch (the one we want to deploy) and Envoyer’s deploy hook ID and if they all match, it performs a HTTP GET request to Envoyer. Feel free to update it to your needs, add some form of authentication or even use any other language supported by Lambda.
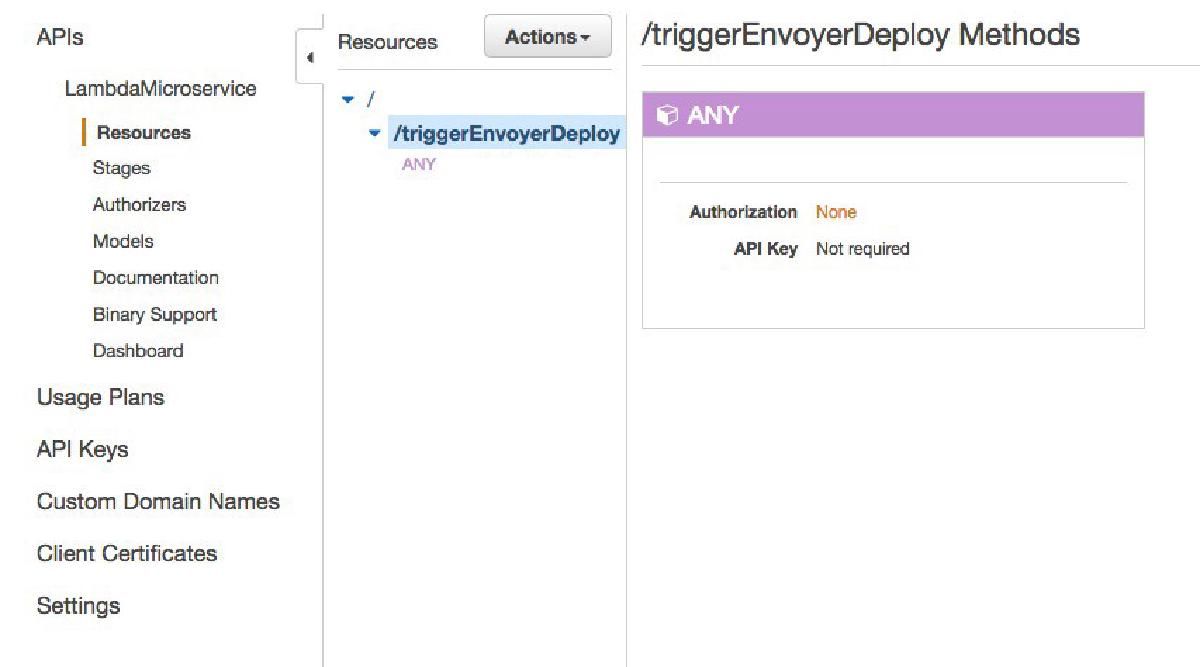
In order for this function to be accessible from Travis, we need to publish the Amazon API Gateway. Head out to API Gateway service, and make sure that there is no authorization on the **/triggerEnvoyerDeploy** resource.
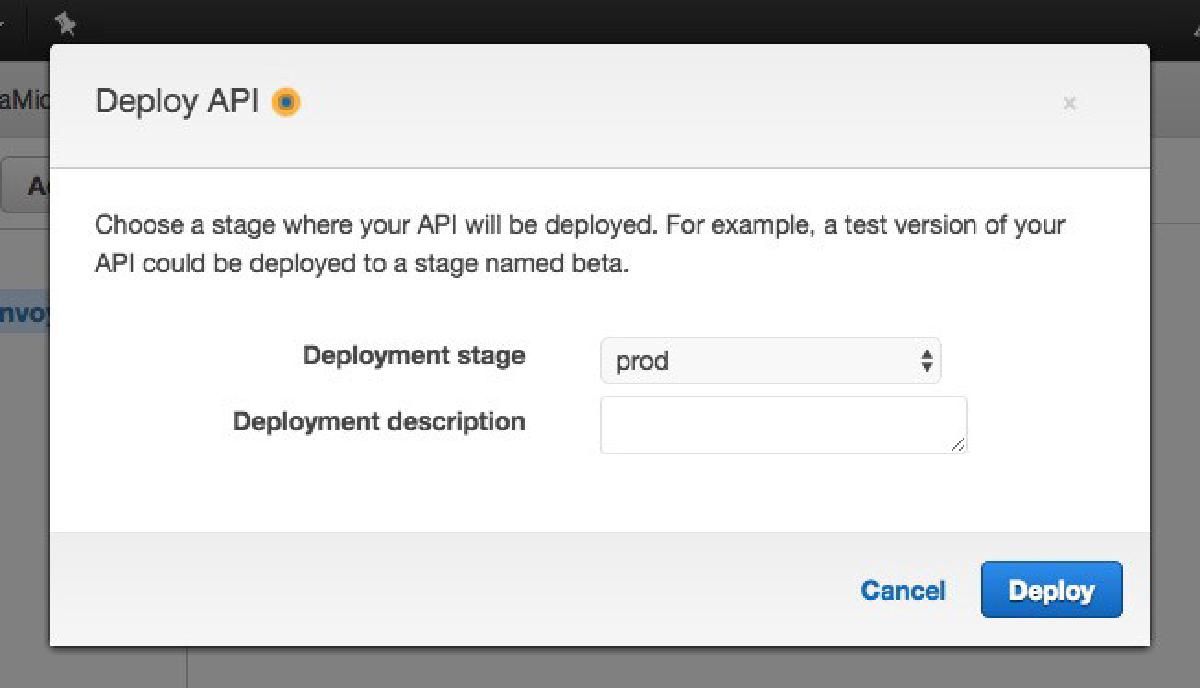
Click on Actions → Deploy API and click Deploy to deploy the API into production.
To make sure you’re not going to DDOS Envoyer’s deployment service, it’s a good idea to leverage the request throttling options and reduce the maximum requests to 1 per second or even less (is that even possible?).
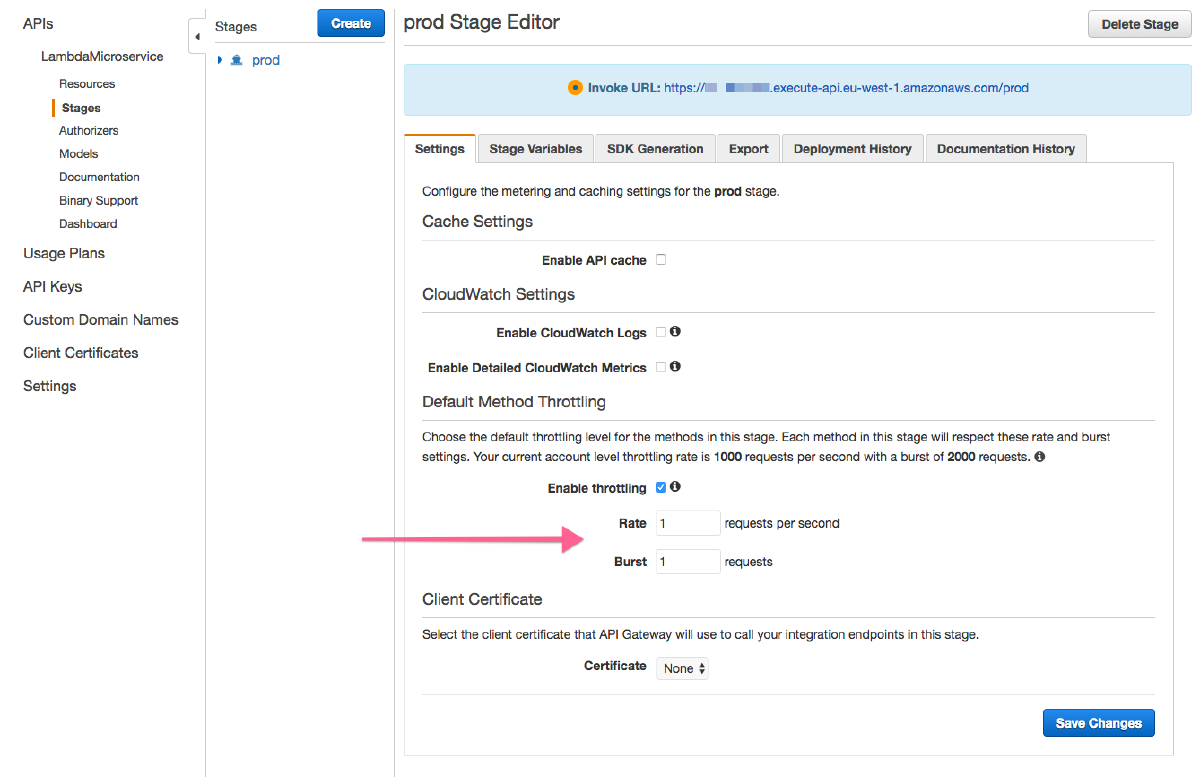
Integrate the Invoke URL displayed in the Stage Editor page above into your .travis.yml configuration file:
notifications:
  webhooks:
      urls:
        - https://MICROSERVICE_ID.execute-api.AWS_ZONE.amazonaws.com/prod/triggerEnvoyerDeploy?branch=master&envoyer_id=YOUR_ENVOYER_DEPLOYMENT_ID
      on_success: always
      on_failure: never
To find out YOUR_ENVOYER_DEPLOYMENT_ID, open Envoyer, navigate to your project, and click the Deployment Hooks tab.
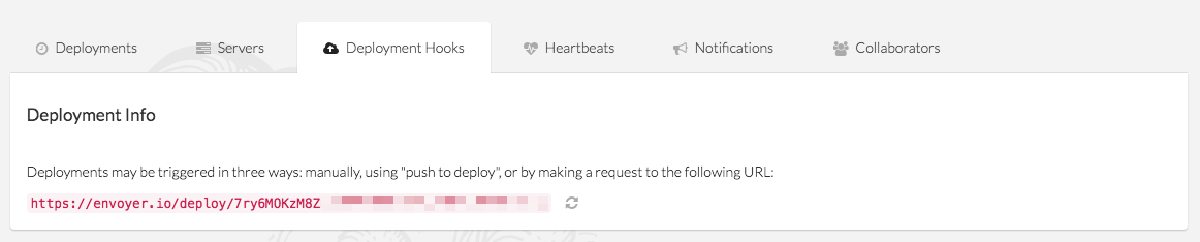
Take just the alphanumeric string after the /deploy/ part and replace the YOUR_ENVOYER_DEPLOYMENT_ID into the .travis.yml file. While you’re on it, also make sure that Envoyer isn’t configured to deploy on push, otherwise everything we’re doing here is useless.
Finally, commit and push the configuration file. If you’ve pushed to the branch specified in webhooks directive above, you’ll see the deploy kicking in within Envoyer.

There you go! Each time you have a successful build on the configured branch, the code will be pushed into production.
Now, aren’t you going to be happier from now on? :-)
My Lambda Endpoint
If you’ve run into troubles following the steps above and you’re not happy with the results, or just want to try things out, feel free to use my Lambda Function for your deployments.
Here’s my API Invoke URL:
https://bd1k3va8nl.execute-api.eu-west-1.amazonaws.com/prod/triggerEnvoyerDeploy?branch=master&envoyer\_id=YOUR\_ID
Replace YOUR_ID with your Envoyer ID, optionally change master to your desired branch, add it to .travis.yml and you’re good to go. Just don’t rely on it to be available forever, as it is there for testing purposes only and may be removed or altered at any time and without any notice.
Other platforms
Travis-CI and Laravel Envoyer are not the only tools that can be linked this way.
You can adapt this solution to link any other CI tool or other deployment tool. The only condition is for both of them to support some kind of web-hooks.
I like the Amazon Lambda solution because it is a smart way to add logic between web-hooks belonging to different systems, the first million runs are free and it’s very extensible.
You can adapt the Lambda Function to log deploys or perform any other tasks, even perform several deploys to various tools.
There’s no limit to what you can accomplish.